NiCr (read as 'nicrome') is the name of my CNC Hot Wire Foam Cutter, an OpenSource/OpenHardware project that I'm making public with this post.
The github repository: https://github.com/JMG1/NiCr
Description:
As the name says, the machine cuts shapes from foam blocks, being the original intention to cut wing cores for lamination and molding.
I've composed a little video about it:
I'm opening this project in exchange of all the good things that the OpenSource world has given to me (I like to think about it as 'from the OpenSource to the OpenSource').
Details:
The NiCr project can be divided in three parts: Machine, Arduinoand FreeCAD
-Machine:
The machine is the physical thing, and is being designed to be built from easy to find, easy to work with materials, like extruded aluminium tubes and simple bolted joints, taking into account a low budget and the DIY factor (only cut/drill/bend operations).
It features two CoreXY frames, easy-to-find Nema17 motors, and a spring tensor for the wire. The design is also very scalable and can, possibly, be applied to other type of machines.
The design has taken place between FreeCAD and the real world:
FreeCAD pictures:
Detail of the Nema17 stepper, X axis slider and belt pulleys
Machine assembled inside FreeCAD
Real world pictures:
Frame size
Slider on the X axis
First version of the cut-wire tensor
-Arduino:
The machine movement is done with an Arduino Mega 2560 board and a Ramps shield, that, together with four stepper drivers (A4988), some limit switches and a power source form all the electronics.
The firmware is being developed specifically for this machine, you can see some of its parts in this links:
The shapes are created using FreeCAD existing tools and converted later to .nicr (similar to GCode) in a custom workbench.
This workbench features a parametric machine, a shape-to-path algorithm, trajectory planning and simulation tools.
Some pictures of the workbench:
Workbench and parametric machine
Cut path simulation result for three wings with different precision settings
Workbench demo video:
The result of the shape-to-path algorithm is a .nicr file that contains instructions similar to GCode and with this comes a question: Why I have not used the path workbench (in development) and the existing GCode standard? Because this machine produces 2.5D shapes (could do '2.75D' with the addition of a fifth axis, to be studied) and the movement is very different to the movement of a 3D printer or mill, and by using 4 axis, someone can be mistaken and use the code for the wrong machine. Anyway, it is going to be a documented language so export-import tools can be created if needed.
Conclusion:
NiCr is in active development, at the moment I'm trying to achieve a basic stability and usability of the software before releasing (and some documentation too, maybe the hardest thing!). Once I achieve that, the code and machine 3d parts will be uploaded to github (I have not decided the particular license yet) After a complete day of reading about licenses, I have chosen the GNU GPL. I'll be updating this post with any news I have.
-> January 1, code uploaded to github: https://github.com/JMG1/NiCr
While the video itself is not very exciting, it shows a machine moving using custom code (of course, I'm excluding the bootloader and stepper firmware, not to mention the complete Linux core running on the pc...).
You can find the code used in the video (Arduino and Python) in this github repository The code is as is (being it a test I have not taken the time to clean it).
The next step is to achieve a continuous movement (currently, it stops completely between instructions) using some kind of instruction buffer.
The input is an int array { MA, MB, MC, MD } where each int means the number of steps (positive or negative).
The stepper movement logic is stored into a boolean[8] array { SA, DA, SB, DB.... } where SA means step for motor A and DA is the direction bit of the motor A (for a 2 wire stepper driver, like the a4988). This array is erased and re-computed every loop cycle with the next movement, so real motor stepping has to take place inside this loop.
The image below (created with FreeCAD) shows a representation of the algorithm output for a requested movement of ( 5, 15, 25, 40 ) steps.
Input ( 5, 15, 25, 40 ), step bit only
It would be possible to do some kind of buffer by translating that boolean array into an int inside an int array. This should be a more-less memory efficient way of decoupling motion logic and motion execution, something to try in a future.
The code:
/*
* JMG October 2015
* NiCr Stepper Sync Algorithm V1
* Tested on Arduino Nano (Ide 1:635)
*
*/// stepper_instruction { Step1A, Dir1A, Step1B, Dir1B, Step2A, Dir2A, Step2B, Dir2B }bool stepper_instruction[8] = { 0, 0, 0, 0, 0, 0, 0, 0 };
voidmoveAB( int Adx, int Ady, int Bdx, int Bdy )
{
int delta[4] = { Adx, Ady, Bdx, Bdy };
int aux = 0;
for( int i = 0; i < 4; i++ )
{
if( abs(delta[i]) > aux )
{
aux = abs(delta[i]);
}
}
float R[4] = { 0, 0, 0, 0 };
for( int i = 0; i < 4; i++ )
{
R[i] = (float)delta[i] / (float)aux;
}
int inc[4] = { 0, 0, 0, 0 };
int acc[4] = { 0, 0, 0, 0 };
int j = 0;
while( ( acc[0] != Adx )||( acc[1] != Ady )||( acc[2] != Bdx )||( acc[3] != Bdy ) )
{
j++;
for( int i = 0; i < 4; i++ )
{
inc[i] = round( R[i]*j - acc[i] );
acc[i] = acc[i] + inc[i];
stepper_instruction[2*i] = abs( inc[i] );
if( inc[i] < 0 ) { stepper_instruction[2*i+1] = 1; }
else { stepper_instruction[2*i+1] = 0; }
}
for( int i = 0; i < 7; i++ )
{
Serial.print( stepper_instruction[i] );
}
Serial.println( stepper_instruction[7] );
for( int i = 0; i < 8; i++ )
{
stepper_instruction[i] = 0;
}
}
for( int i = 0; i < 4; i++ )
{
Serial.print( acc[i] );
}
Serial.println();
for( int i = 0; i < 4; i++ )
{
Serial.print( delta[i] );
}
}
voidsetup()
{
Serial.begin( 115200 );
delay( 500 );
moveAB( 100, -5000, 780, 25 );
}
voidloop()
{
}
It prints by serial (115200 baud) the values of stepper_instruction at each loop cycle, and the counted steps vs the requested steps at the end of the loop.
I'm sure this is not the optimal way of doing it, but it works.
When using Arduino, parsing serial data and converting it to something usable is way harder than it seems.
While this functionality is specially useful as it allows your computer to talk with the Arduino easily, a quick search on google will give you thousands of very different solutions. The one exposed here is just another one that is working perfectly for me.
The instruction:
The idea is to set the position of three servos by serial and also be able to change other parameters.
The instruction, then, must be composed from an instruction name and the parameters, for example, to move the three servos:
MOVE 120 23 90
And, if we also want to switch on a light, the instruction could be:
LIGHT ON
How do we get the Arduino to know that we want the servos to move and then switch on a light?
Arduino Read Instruction:
Code:
/*
JMG OCTOBER 2015
This script is made up from snippets found in stackoverflow and other
google results
*/voidsetup()
{
// open serial port at 115200 baud
Serial.begin(115200);
}
String complete_instruction[4]; // will contain the decoded instruction (4 fields)voidloop()
{
while(!Serial.available()) {} // if there is nothing on serial, do nothing
int i = 0;
char raw_instruction[25];
while (Serial.available())
{ // if something comes from serial, read it and store it in raw_instruction char array
delay(10); // delay to allow buffer to fill
if (Serial.available() > 0)
{
raw_instruction[i] = Serial.read();
i++;
}
}
if( strlen( raw_instruction ) > 0 ) // if a new raw_instruction has been read
{
// clean raw_instruction before decoding (overwrite non filled array positions with empty spaces)
for( int n = i; n < 25; n++ ) { raw_instruction[n] = ' '; }
// decode the instruction (4 fields) (iterator n = field, iterator j = character)
int j = 0;
for( int n = 0; n < 4; n++ )
{
while( j < 25 )
{
if( raw_instruction[j] == ' ' )
{
j++;
break;
}
else
{
complete_instruction[n] += raw_instruction[j];
}
j++;
}
}
// print decoded instruction by serial
for( int n = 0; n<4; n++ )
{
Serial.println( complete_instruction[n] );
// clear field after using it
complete_instruction[n]="";
}
}
delay(50);
}
The summary is that you can send by serial something like "A B C D" (using space as delimiter) and the variable complete_instruction will contain {A, B, C, D}. A,B,C,D can be any kind of data of any length you want, for the instruction MOVE 120 23 90, it will return {"MOVE", "120", "23", "90"}. For the second instruction LIGHT ON, it will return {"LIGHT", "ON", "", "" }.
This way, now you just need to set several if conditions to check if the instruction says "MOVE", "LIGHT", "KILL" or whatever, and if it does, check the remaining parameters (you can use toInt() or toFloat() for numeric values).
My experience with this script is that it works as intended and does not cause memory problems. But I do not have enough knowledge about C to assure that it will not crash your script (from what I've read, String variables together with low RAM space seem to give problems.) Just take it into account if something very weird is happening. (code updated, memory problem solved?)
I write this brief post to explain, among other things, what is currently happening with the sheet metal workbench:
The workbench at the moment is at 30%: Document structure is almost done, simple unfold is working and there are tools, like this one, to create even more complex and powerful features.
Also, I talked about some crowdfounding campaign or paid development for this workbench: all it is stopped because I've found a powerful sponsor (to be revealed in a future).
Am I working at sheet metal?
No. I'm going to be studying from now until I finish my degree, somewhere around December. But this does not mean a complete shutoff, there are things and important works on the way.
For example, for the "maker" community, I am developing a new machine that is being born by the end of this year (and is part of my degree project). An open source machine with stepper motors, completely designed with FreeCAD, that works using Arduino and Python and is not a 3D printer.
Also, I've been working in improvements at the "Exploded Assembly Animation workbench" and additions to the macro "WorkFeatures"
In conclusion, things are going to freeze a bit, but no project is going to disappear.
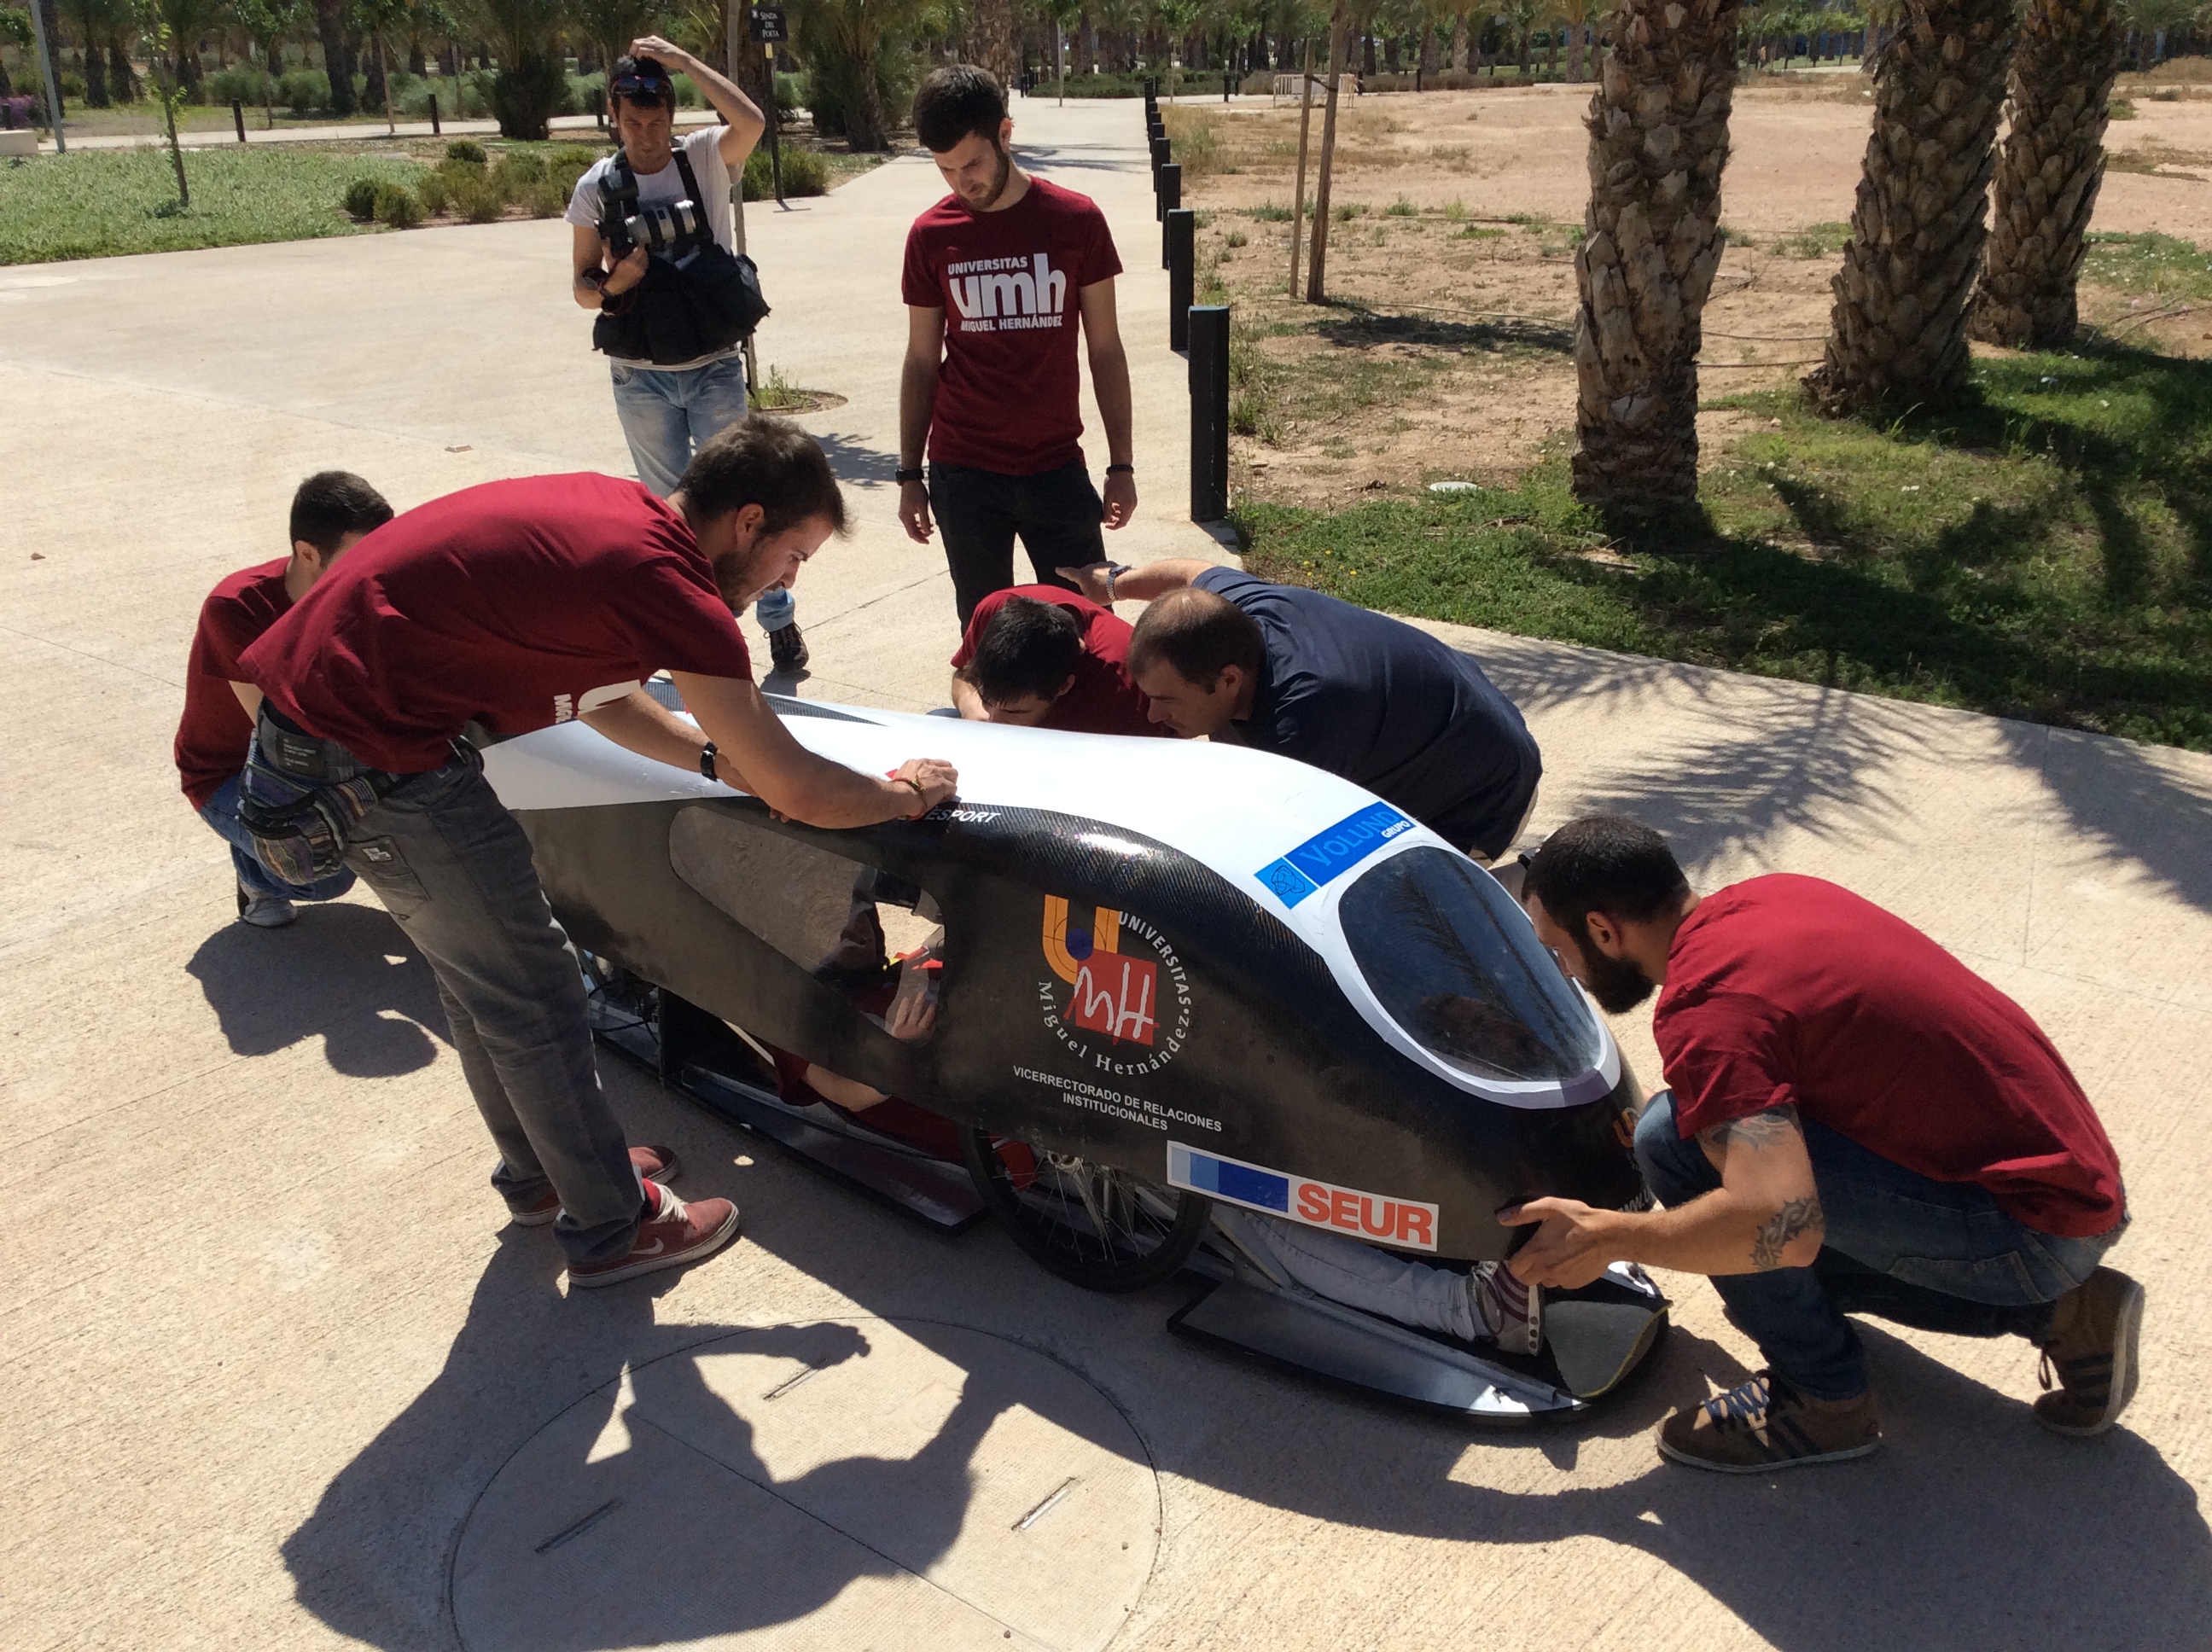
I am member of the UMH Team, a group of students that build a prototype car to race at the Shell Ecomarathon, an event that this year takes place at Rotterdam. Currently, we are in the first position of the spanish championship, leading it in the combustion category, with a fuel consumption of 1223 kilometers / litre of ethanol. In the European competition, we have been at the top ten, but past edition we finished 13th at combustion category and 3rd on ethanol.
This year we are building a completely new car that we hope bring us to the podium.
What I am showing here is the cover of the new prototype, that I designed using FreeCAD, simulated using SolidWorks, and later converted to CNC code using Hypermill. Special thanks go to Volund Group for their help and support.
The FreeCAD part:
The cover is designed using already existing tools, basically is a loft going through several sketches that I placed using a simple script.
This is the first one I did, just to test if FreeCAD was able to acomplish this work.
The car frame was made with Autodesk Inventor and imported as IGES, then I started to create the sketch-ribs and finally a loft through all them. I adjusted the sketches to obtain the desired shape. Once happy with it, I made the windows and a basic visibility test to ensure we are compliance with the rules of the race.
The rules specify that a pilot must be able to see a polar array of cylinders that are around the car with an angle of 30 degrees between each one.
Thanks to FreeCADs perspective view, I could check window sizes and do some optimization.
This is the pilot's point of view
Simulation:
The covering was simulated using SolidWorks, resulting in a Cx of 0.33.
Milling:
Once we performed another tests and confirmed that everything was ready, we started to machine a foam block to create a positive mould. We have used a medium-sized CNC milling center (Volund Group) that can handle the 3000 mm of length of this car:
Raw block:
Rough pass:
Smoothing pass:
The smoothing pass is finishing as I write this. What we are doing next is to epoxy and fiberglass it to create the negative mould and then, do the carboon fiber cover. I will edit this post to upload finished pictures.
I hope this serves an example of real world usage of FreeCAD, beyond 3D printing.
Maybe I do a tutorial to show how to model surfaces like this prototype cover, stay tuned.
I'm having september exams, and that's the reason for not publishing anything remarkable this month. But that doesn't mean I've stopped doing FreeCAD stuff.
This is what is currently going on:
A GCode generator for 2D CNC cutter. Is very experimental, but starts to show results. (green fast movement, red = given feed speed)
I've also worked with the SheetMetal project, where I re-coded a big part of it. I hope to finish it somewhere around next year.
Related with 2D CNC, I remodelled my crappy machine and did this:
It does more less what is intended. The weird result can be half attributed to the machine and the other half to the code. I coded a bit more after that video, now it draws better.
The machine is working with an arduino DUE and three 4899et. It talks with FreeCAD by serial (USB), with a custom code running in the arduino.
I also tried to create a game using FreeCAD, basically a model of a car controlled by joystick. Is almost working, but because of its non-sense nature, is the lower on my preferences list.
-Create another function that, with the value of the serial, updates the object in FreeCAD
-Call them repetitively by a timer
The Arduino part:
At the video I'm using an Arduino DUE because it was handy, but an UNO board is valid too.
The electrical thing consists of connecting a variable resistor to the A0 pin, like the scheme:
Any variable resistor above 1kΩ will do the job, in the video I use a 4.7kΩ one.
The code is quite simple:
void setup()
{
  Serial.begin(9600);                  /// Start serial at 9600 baud
  pinMode( A0, INPUT );                /// Set pin A0 as input
}

void loop()
{
  Serial.println( analogRead( A0 ) );  /// Print to serial A0 value
}
Initialize serial and then constantly print the sensor value.
The Python code:
This are the needed libraries:
import serial
from PySide import QtCore
Serial for reading the serial (obvious one) and PySide for the timer object.
To initialize the serial at 9600 baud pointed to the Arduino:
ser = serial.Serial('/dev/ttyACM0', 9600)
The Arduino serial should be in '/dev/ttyACM0' but sometimes it switches to '/dev/ttyACM1',
if you fire up the Arduino Ide and open the serial window, the path is at the window title.
The name "ser" now contains the serial, which we can read this way:
ser.readline()
That prints whatever the serial is saying.
The FreeCAD part:
We need a function that changes the position of the servo arm to the input value. From the arduino, we receive a number from 0 to 1024, a servo rotates ~180 degrees, so a conversion is needed.
defSERVO(valor):
angle = valor*-180.0/1024.0
Position = FreeCAD.Placement(App.Vector(12.5,12,53),App.Vector(0,0,1),angle)
FreeCAD.ActiveDocument.Fillet004.Placement = Position
The first line of the function SERVO is the 1024 to 180º conversion, the second and third ones do the position change of the FreeCAD object. Note that the servo arm is called "Fillet004".
You can test this function by giving values to it, like SERVO(200) or SERVO(1000), it should move.
The link:
The function SERIAL links everything together:
servalue0 =0# avoid problems with serial initializationdefSERIAL():
global servalue0
hysteresis =6.0# to smooth the movementtry:
servalue =int(ser.readline()) # to int the serial valueexcept:
servalue = servalue0
if servalue > servalue0 + hysteresis or servalue < servalue0 - hysteresis:
SERVO(servalue) # update the servo position
servalue0 = servalue # keep last value to check hysteresis
The timer:
To give it life we need to call SERIAL function repetitively with a timer:
First line creates timer object, second one connects its signals to the SERIAL function and the third one makes it emit a signal every 1 ms.
Complete Python script:
If you just want to test it, create the Arduino circuit, download the servo model and copy paste this at FreeCAD console:
"""
Javier Martinez Garcia, 2014
"""import serial
from PySide import QtCore
try:
ser = serial.Serial('/dev/ttyACM0', 9600)
except:
ser = serial.Serial('/dev/ttyACM1', 9600)
defSERVO(valor):
angle = valor*-180.0/1024.0
Position = FreeCAD.Placement(App.Vector(12.5,12,53),App.Vector(0,0,1),angle)
FreeCAD.ActiveDocument.Fillet004.Placement = Position
servalue0 =0# avoid problems with serial initializationdefSERIAL():
global servalue0
hysteresis =6.0# to smooth the movementtry:
servalue =int(ser.readline()) # to int the serial valueexcept:
servalue = servalue0
if servalue > servalue0 + hysteresis or servalue < servalue0 - hysteresis:
SERVO(servalue) # update the servo position
servalue0 = servalue # keep last value to check hysteresis
timer = QtCore.QTimer()
timer.timeout.connect(SERIAL)
timer.start(1)
And this is all you need to repeat my video.
There are things that can be improved, for example the timer. Maybe using the threading library can give the same result.
About the possibilities, the communication can be bi-directional too, here I show realworld->FreeCAD, but the opposite is perfectly possible. And the FreeCAD objects attributes that can be changed do not need to be exclusively placement, but color or even parametric models.
Before starting, I must warn that this is not intended to produce any realistic simulation.
I created it as a proof of concept and for fun.
How it works:
The milling script removes material by cutting the workpiece with the tool object (a rectangular box) in a simple Part.cut(tool) operation.
The tool object position is determined by taking the last point and the next point from the path points list. Then, the script creates vector and walks through it by steps. At every step, the tool cuts the workpiece, and every 4 steps, the document is refreshed. Refreshed means the command Part.show(workpiece). Because this command creates a shape every time is called, before Part.show(workpiece), the previous shape is removed.
Wild and dirty.
Below I try to explain how to use this script. You can get the full code here
Creating toolpath:
The first thing we need is the list of points that the "tool" will follow.
This list has the form:
Raw = Part.makeBox(raw_size[0],raw_size[1],raw_size[2])
Raw_shape = App.ActiveDocument.addObject("Part::Feature","Workpiece")
Raw_shape.Shape = Raw
Gui.ActiveDocument.getObject("Workpiece").Visibility=False
This is the function that performs the milling-like action:
L1 = Raw.cut(Tool_shape.Shape)
Part.show(L1)
i=0
n=0.0
swd =3# cut refreshing interval
s=0def Machining():global n, i,feed_rate, L1, Tool_radius, swd, s
if i <=len(Program):
Current_position = Tool_shape.Placement.Base
Vector_trajectory = App.Vector(Program[i+1])-App.Vector(Program[i])
Vector_direction =(App.Vector(Program[i+1])-App.Vector(Program[i])).normalize()
VT_modulus = Vector_trajectory.Length
VD_modulus =1.0if VT_modulus > VD_modulus*n*feed_rate:
Next_position = App.Vector(Program[i])+Vector_direction.multiply(n*feed_rate)+App.Vector(-Tool_radius,-Tool_radius)
n+=0.1else:
Next_Position = App.Vector(Program[i+1])
i+=1
n=0.0
s +=1if s > swd:
App.ActiveDocument.removeObject("Shape")
L1 = L1.removeSplitter()
Part.show(L1)
s =0
Tool_shape.Placement = App.Placement(Next_position, ToolR)
AnimatedTool.Placement = App.Placement(Next_position+App.Vector(Tool_radius,Tool_radius,0), App.Rotation(App.Vector(0,0,1),n*43))
L1 = L1.cut(Tool_shape.Shape)
Then, by calling repeatedly Machining() with a timer starts the animation:
timer=QtCore.QTimer()

timer.timeout.connect(Machining)

timer.start(1)
With the tool-path created above this is the result:
What's next?
Well, I've been playing with creating the points list using a script that follows the contour of a FreeCAD part. That way you will only need to execute that script and then run the simulation.